LookMeUp Developer Guide
Acknowledgements
LookMeUp is a brownfield software project based off AddressBook Level-3, taken under the CS2103T Software Engineering, at National University of Singapore.
- The UI features of
AddCommandHelperwas reused with minimal changes from Snom. Fuzzy Inputwas adapted from geeksforgeeks.- GitHub Co-Pilot was used sparingly as an autocomplete tool in the writing of some code snippets.
Setting up, getting started
Refer to the guide Setting up and getting started.
Design
Architecture
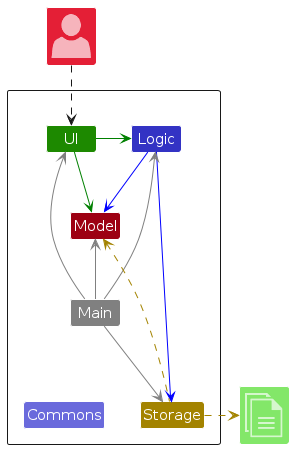
The Architecture Diagram given above explains the high-level design of the App.
Given below is a quick overview of main components and how they interact with each other.
Main components of the architecture
Main (consisting of classes Main and MainApp) is in charge of the app launch and shut down.
- At app launch, it initializes the other components in the correct sequence, and connects them up with each other.
- At shut down, it shuts down the other components and invokes cleanup methods where necessary.
The bulk of the app's work is done by the following four components:
UI: The UI of the App.Logic: The command executor.Model: Holds the data of the App in memory.Storage: Reads data from, and writes data to, the hard disk.
Commons represents a collection of classes used by multiple other components.
How the architecture components interact with each other
The Sequence Diagram below shows how the components interact with each other for the scenario where the user issues the command remove 1.
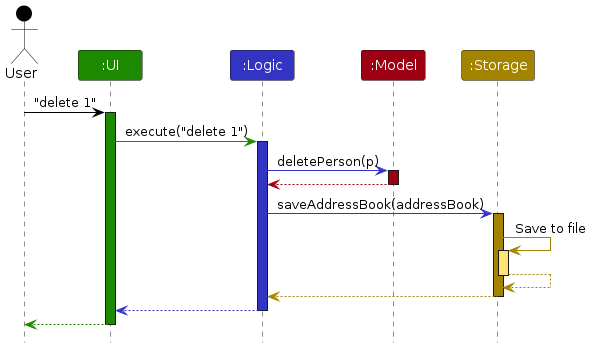
Each of the four main components (also shown in the diagram above),
- defines its API in an
interfacewith the same name as the Component. - implements its functionality using a concrete
{Component Name}Managerclass (which follows the corresponding APIinterfacementioned in the previous point.
For example, the Logic component defines its API in the Logic.java interface and implements its functionality using the LogicManager.java class which follows the Logic interface. Other components interact with a given component through its interface rather than the concrete class (reason: to prevent outside component's being coupled to the implementation of a component), as illustrated in the (partial) class diagram below.

The sections below give more details of each component.
UI component
The API of this component is specified in Ui.java
The diagram below represents a partial implementation of the UI components of LookMeUp
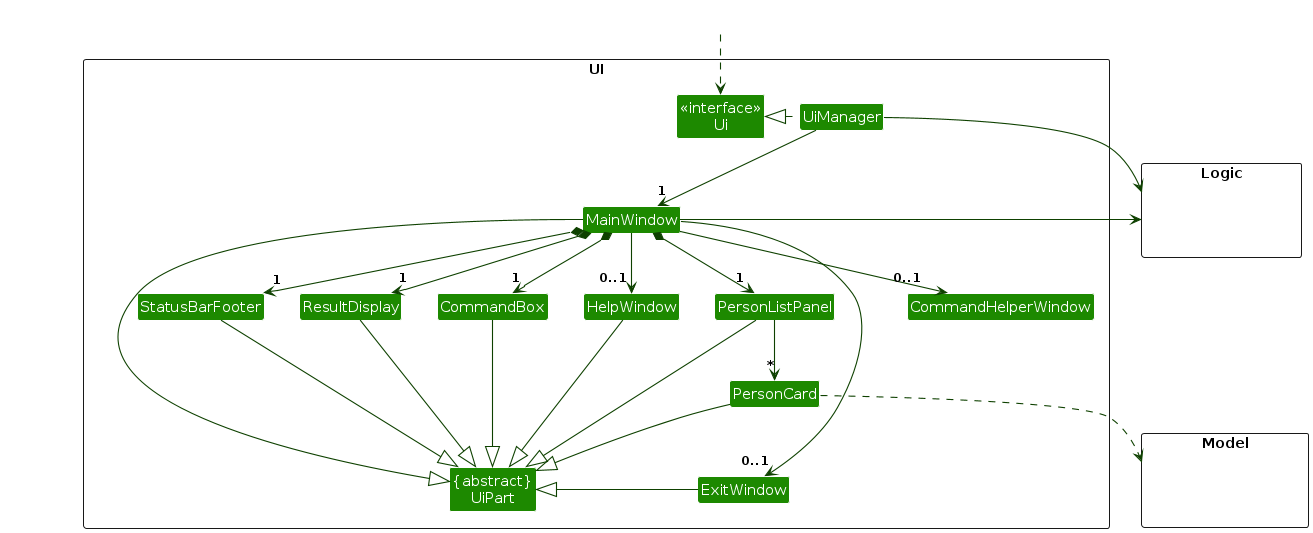
The UI consists of a MainWindow that is made up of parts e.g.CommandBox, ResultDisplay, PersonListPanel, StatusBarFooter etc. All these, including the MainWindow, inherit from the abstract UiPart class which captures the commonalities between classes that represent parts of the visible GUI.
The CommandHelperWindow has a different implementation from the rest of the UI components, which will be explained in detail at the Add By Step feature. This is to avoid cluttering the architecture diagram.
The UI component uses the JavaFx UI framework. The layout of these UI parts are defined in matching .fxml files that are in the src/main/resources/view folder. For example, the layout of the MainWindow is specified in MainWindow.fxml
The UI component,
- executes user commands using the
Logiccomponent. - listens for changes to
Modeldata so that the UI can be updated with the modified data. - keeps a reference to the
Logiccomponent, because theUIrelies on theLogicto execute commands. - depends on some classes in the
Modelcomponent, as it displaysPersonobject residing in theModel.
Logic component
API : Logic.java
Here's a (partial) class diagram of the Logic component:

The sequence diagram below illustrates the interactions within the Logic component, taking execute("remove 1") API call as an example.
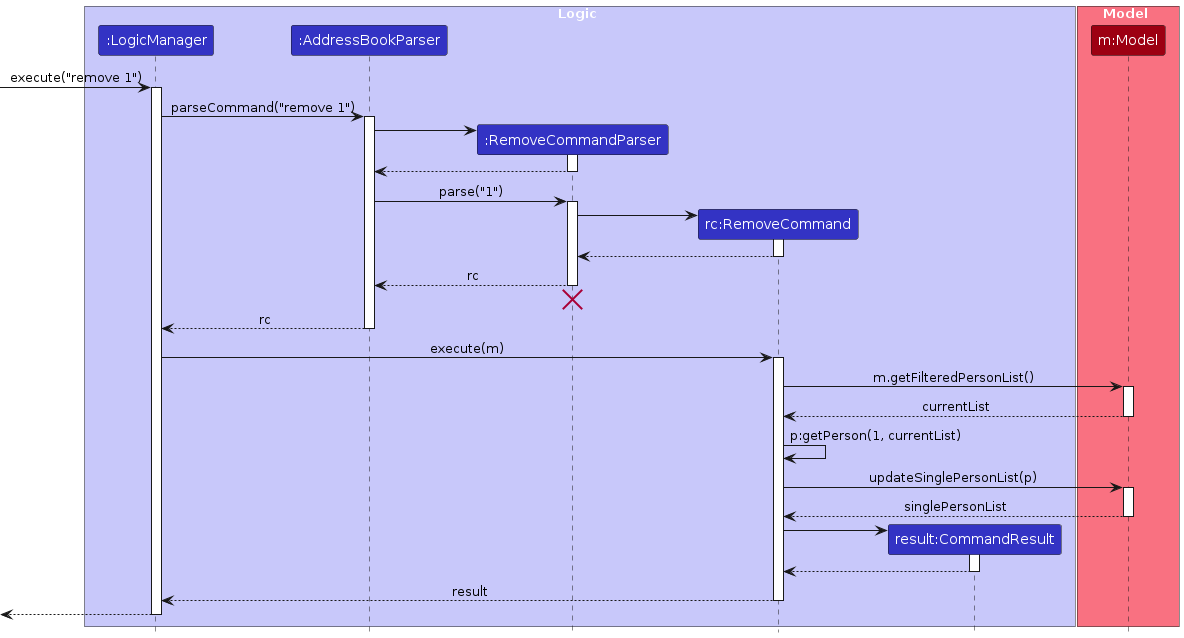
Note: The lifeline for RemoveCommandParser should end at the destroy marker (X) but due to a limitation of PlantUML, the lifeline continues till the end of diagram.
How the Logic component works:
- When
Logicis called upon to execute a command, it is passed to anAddressBookParserobject which in turn creates a parser that matches the command (e.g.,RemoveCommandParser) and uses it to parse the command. - This results in a
Commandobject (more precisely, an object of one of its subclasses e.g.,RemoveCommand) which is executed by theLogicManager. - The command can communicate with the
Modelwhen it is executed (e.g. to remove a person).
Note that although this is shown as a single step in the diagram above (for simplicity), in the code it can take several interactions (between the command object and theModel) to achieve. - The result of the command execution is encapsulated as a
CommandResultobject which is returned back fromLogic.
Here are the other classes in Logic (omitted from the class diagram above) that are used for parsing a user command:
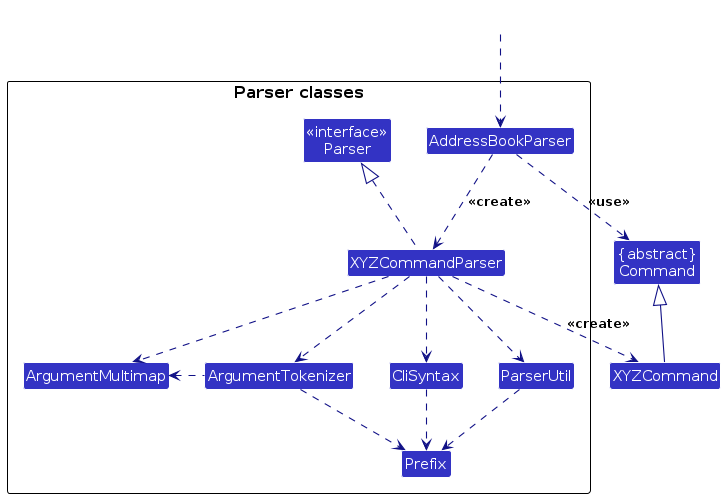
How the parsing works:
- When called upon to parse a user command, the
AddressBookParserclass creates anXYZCommandParser(XYZis a placeholder for the specific command name e.g.,AddCommandParser) which uses the other classes shown above to parse the user command and create aXYZCommandobject (e.g.,AddCommand) which theAddressBookParserreturns back as aCommandobject. - All
XYZCommandParserclasses (e.g.,AddCommandParser,RemoveCommandParser, ...) inherit from theParserinterface so that they can be treated similarly where possible e.g, during testing.
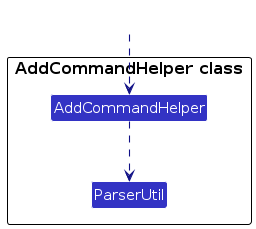
How the AddCommandHelper works:
- When the user enters an input into the CommandHelperWindow, AddCommandHelper will use the methods defined in
ParserUtilto check whether the input by the user is valid. This will be explained in detail in the AddByStep Feature.
Model component
API : Model.java
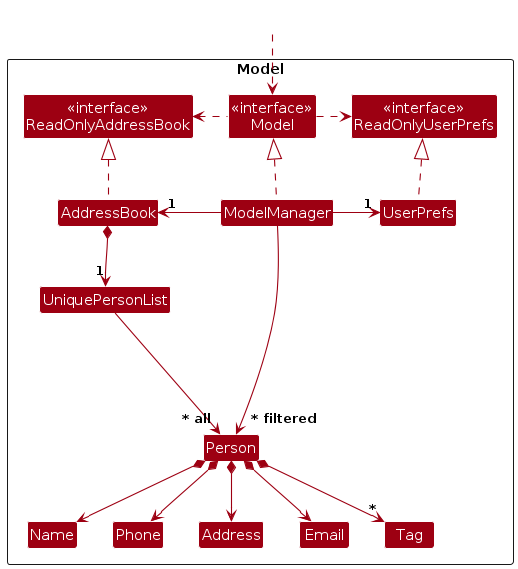
The Model component,
- stores the address book data i.e., all
Personobjects (which are contained in aUniquePersonListobject). - stores the currently 'selected'
Personobjects (e.g., results of a search query) as a separate filtered list which is exposed to outsiders as an unmodifiableObservableList<Person>that can be 'observed' e.g. the UI can be bound to this list so that the UI automatically updates when the data in the list change. - stores a
UserPrefobject that represents the user’s preferences. This is exposed to the outside as aReadOnlyUserPrefobjects. - does not depend on any of the other three components (as the
Modelrepresents data entities of the domain, they should make sense on their own without depending on other components)
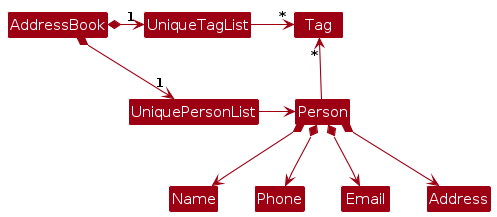
Note: An alternative (arguably, a more OOP) model is given below. It has a Tag list in the AddressBook, which Person references. This allows AddressBook to only require one Tag object per unique tag, instead of each Person needing their own Tag objects.
Storage component
API : Storage.java
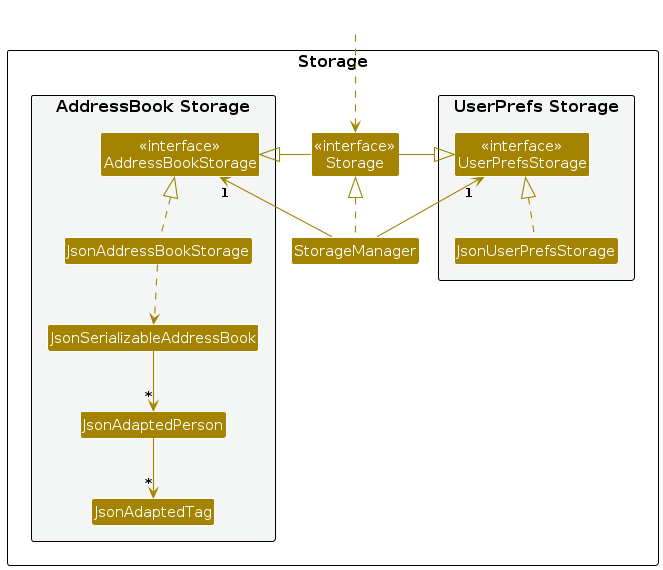
The Storage component,
- can save both address book data and user preference data in JSON format, and read them back into corresponding objects.
- inherits from both
AddressBookStorageandUserPrefStorage, which means it can be treated as either one (if only the functionality of only one is needed). - depends on some classes in the
Modelcomponent (because theStoragecomponent's job is to save/retrieve objects that belong to theModel)
Common classes
Classes used by multiple components are in the seedu.addressbook.commons package.
Implementation
This section describes some noteworthy details on how certain features are implemented.
Undo/redo feature
Implementation
The undo/redo mechanism is facilitated by VersionedAddressBook. It extends AddressBook with an undo/redo history,
stored internally as an addressBookStateList and currentStatePointer. Additionally, it implements the following
operations:
VersionedAddressBook#commit()— Saves the current address book state in its history.VersionedAddressBook#undo()— Restores the previous address book state from its history.VersionedAddressBook#redo()— Restores a previously undone address book state from its history.
These operations are exposed in the Model interface as Model#commitAddressBook(), Model#undoAddressBook() and
Model#redoAddressBook() respectively.
Given below is an example usage scenario and how the undo/redo mechanism behaves at each step.
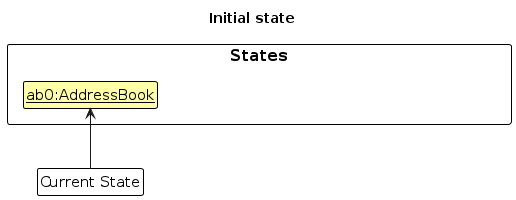
- Step 1. The user launches the application for the first time. The
VersionedAddressBookwill be initialized with the initial address book state, and thecurrentStatePointerpointing to that single address book state.
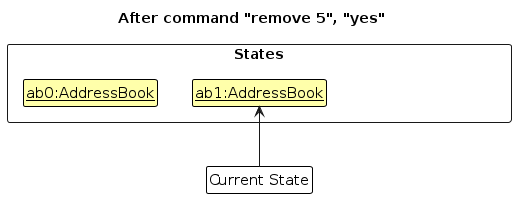
- Step 2. The user executes
remove 5command to remove the 5th person in the address book followed by ayesconfirmation. The confirmation command callsModel#commitAddressBook(), causing the modified state of the address book after the removal execution to be saved in theaddressBookStateList, and thecurrentStatePointeris shifted to the newly inserted address book state.
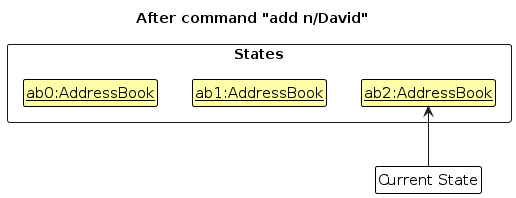
- Step 3. The user executes
add n/David …to add a new person. Theaddcommand also callsModel#commitAddressBook(), causing another modified address book state to be saved into theaddressBookStateList.
Note: If a command fails its execution, it will not call Model#commitAddressBook(), so the address book state
will not be saved into the addressBookStateList.
- Step 4. The user now decides that adding the person was a mistake, and decides to undo that action by executing the
undocommand. Theundocommand will callModel#undoAddressBook(), which will shift thecurrentStatePointeronce to the left, pointing it to the previous address book state, and restores the address book to that state.
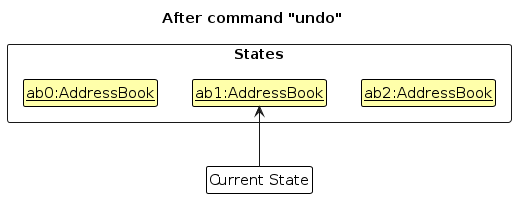
Note: If the currentStatePointer is at index 0, pointing to the initial AddressBook state, then there are no
previous AddressBook states to restore. The undo command uses Model#canUndoAddressBook() to check if this is the
case. If so, it will return an error to the user rather than attempting to perform the undo.
The following sequence diagram shows how an undo operation goes through the Logic component:
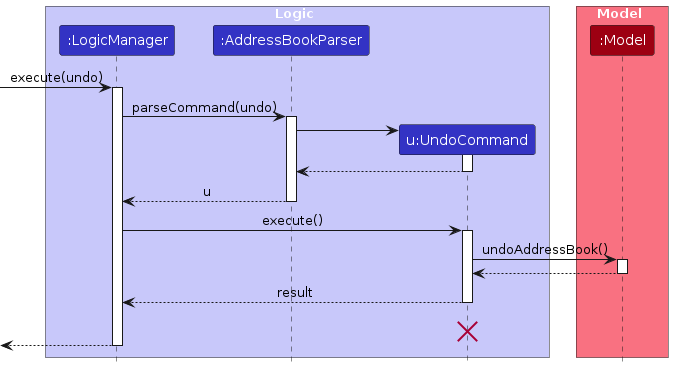
Note: The lifeline for UndoCommand should end at the destroy marker (X) but due to a limitation of PlantUML, the
lifeline reaches the end of diagram.
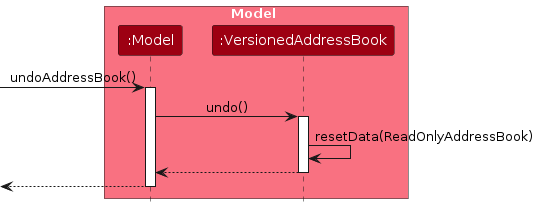
Similarly, how an undo operation goes through the Model component is shown below:
The redo command does the opposite — it calls Model#redoAddressBook(), which shifts the currentStatePointer
once to the right, pointing to the previously undone state, and restores the address book to that state.
Note: If the currentStatePointer is at index addressBookStateList.size() - 1, pointing to the latest address
book state, then there are no undone AddressBook states to restore. The redo command uses Model#canRedoAddressBook()
to check if this is the case. If so, it will return an error to the user rather than attempting to perform the redo.
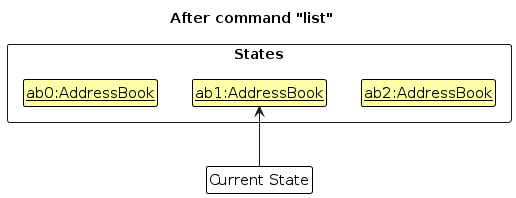
- Step 5. The user then decides to execute the command
list. Commands that do not modify the address book, such aslist, will usually not callModel#commitAddressBook(),Model#undoAddressBook()orModel#redoAddressBook(). Thus, theaddressBookStateListremains unchanged.
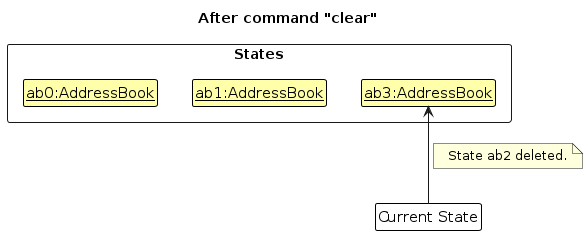
- Step 6. The user executes
clear, which callsModel#commitAddressBook(). Since thecurrentStatePointeris not pointing at the end of theaddressBookStateList, all address book states after thecurrentStatePointerwill be purged. Reason: It no longer makes sense to redo theadd n/David …command. This is the behavior that most modern desktop applications follow.
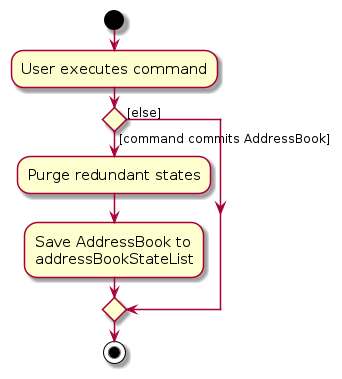
The following activity diagram summarizes what happens when a user executes a new command:
Design considerations:
Aspect: How undo & redo executes:
Alternative 1 (current choice): Saves the entire address book.
- Pros: Easy to implement.
- Cons: May have performance issues in terms of memory usage.
Alternative 2: Individual command knows how to undo/redo by itself.
- Pros: Will use less memory (e.g. for
remove, just save the person being removed). - Cons: Need to ensure that the implementation of each individual command are correct.
- Pros: Will use less memory (e.g. for
Safe-Removal feature
Implementation
The feature to remove contacts from the address book is facilitated by RemoveCommand and RemoveConfirmation.
The safe-removal mechanism consists of several components:
RemoveCommand: A class that takes in theIndexof a contact in the list, and "spotlights" this contact throughModel#getFilteredPersonList()to then prompt the user to confirm the removal of the target person. This class does not perform the actual removal of the contact.RemoveCommandParser: A class that parses the user input to determine the target person to be removed. The class parses theIndexinput when users key inremove INDEX, to proceed with the confirmation process of the actual contact to be removed.
Below is the sequence diagram outlining the execution of RemoveCommand.
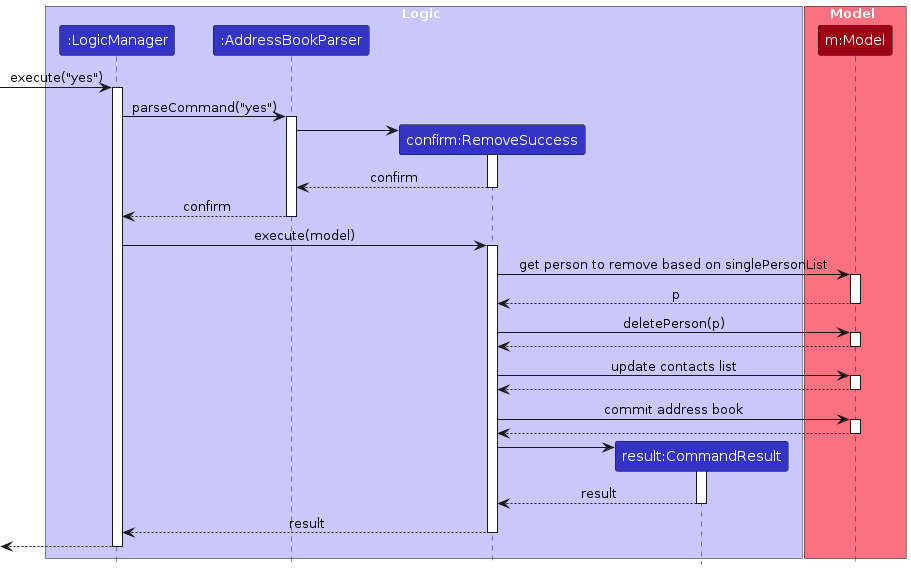
Note: The lifeline for RemoveCommandParser should end at the destroy marker (X) but due to a limitation of PlantUML, the
lifeline reaches the end of diagram.
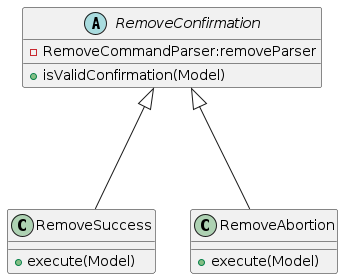
RemoveConfirmation,RemoveSuccessandRemoveAbortion: Classes that prompt the user to confirm the removal of the target person, performing the actual deletion of the contact (or abortion of process), then providing feedback on the success or failure of the removal process.
Below is the sequence diagram outlining the execution of RemoveSuccess, where the user confirms the removal of a contact.
Our implementation follows Liskov's Substitution Principle closely. RemoveConfirmation was designed to be an abstract
class to allow for extension of the 2 confirmation methods via the RemoveSuccess and RemoveAbortion classes. This
decision makes it easier to group similar methods and messages together for better code extendability and
maintainability when it comes to enhancing the confirmation process.
Given below is an example usage scenario and how the safe-removal mechanism behaves at each step.
Assuming existing contacts in the address book (shown in a simplified list for ease of understanding):
- Paul Walker
- Alice Cooper
- Dylan Walker
- Paul Cooper
Step 1: The user executes
remove 4command.- The
removecommand callsRemoveCommandParser#parseCommand(), causingRemoveCommand#execute()to get called RemoveCommandwill proceed with the confirmation process of the actual contact to be removed.- The input will be parsed by
RemoveCommandParserto obtain the intendedIndexto be removed. - User will then be prompted to confirm the removal of the contact with "yes"/"no"
- The user will then key in
yesornoto confirm or abort the removal process.
- The input will be parsed by
Are you sure you want to remove the following contact? (yes/no):
- Paul Cooper
- The
Step 2a: The user confirms the removal of the contact by executing
yescommand.- The
yescommand callsRemoveSuccess#execute()to confirm the removal process. - The confirmation process will be handled by
RemoveSuccessand its parent classRemoveConfirmation.RemoveSuccess#execute()checks if theyesinput is valid, callingRemoveConfirmation#isValidInput()RemoveConfirmation#isValidInput()returnstrueif the input is valid, andfalseotherwise.- Validity of input is determined by the previous command executed by the user - a valid
remove INDEXcommand, that serves as a precursor to the removal confirmation process.
- Validity of input is determined by the previous command executed by the user - a valid
- If the user confirms the removal with
yes,RemoveSuccesswill proceed with the removal process.- The contact will be removed from the address book and
RemoveSuccesswill provide feedback on the success of the removal process.
- The contact will be removed from the address book and
- The
Step 2b: The user aborts the removal of the contact by executing
nocommand.- The
nocommand callsRemoveAbortion#execute()to abort the removal process. - The abortion process will be handled by
RemoveAbortionand its parent classRemoveConfirmation.RemoveAbortion#execute()checks if thenoinput is valid, callingRemoveConfirmation#isValidInput()RemoveConfirmation#isValidInput()will returntrueif the input is valid, andfalseotherwise.- Validity of input is determined by the previous command executed by the user - a valid
remove INDEXcommand, that serves as a precursor to the removal abortion process.
- Validity of input is determined by the previous command executed by the user - a valid
- If the user aborts the removal with
no,RemoveCommandwill abort the removal process.- The default list of contacts will be shown with the text input of the
CommandBoxcleared, andRemoveAbortionwill provide feedback on the abortion of the removal process.
- The default list of contacts will be shown with the text input of the
- The
Step 2c: The user enters an invalid command e.g.
abcinstead ofyes/noafter theremove 4command.- The user will be prompted with an error message:
Unknown Command
- Since the current GUI remains with the spotlighted contact "Paul Cooper", users will need to type
remove 1to be prompted with the confirmation process again, or typelistto return to the default list
Here is an activity diagram that summarizes the process of removing a contact from the address book:
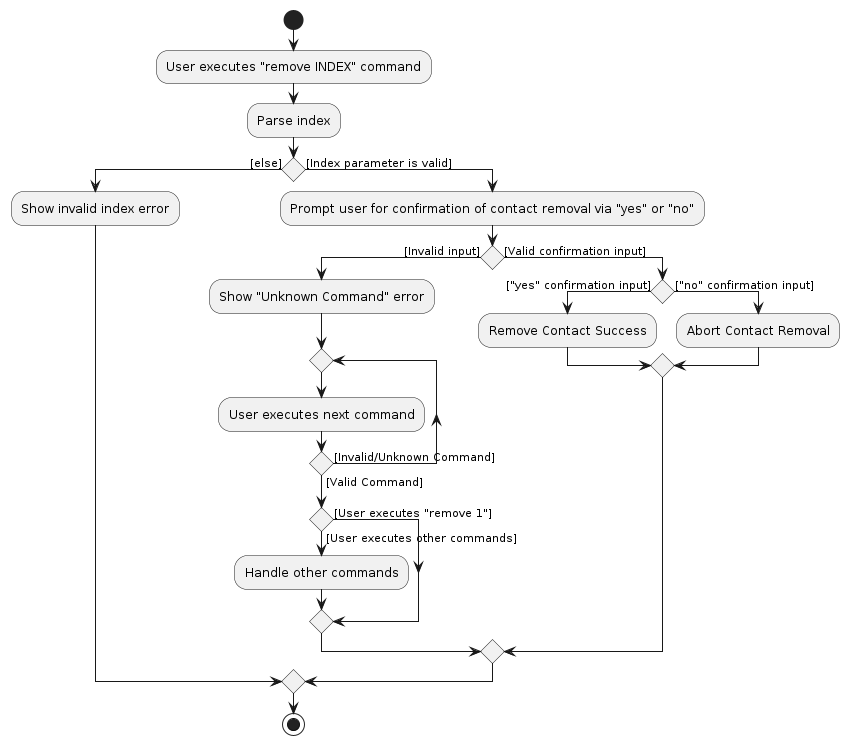
Note: The path from the guard condition [User executes "remove 1"] is supposed to point to Parse index action,
but due to the constraints of PlantUML, it has been simplified to point directly to the merge node below.
Design considerations:
Several design considerations were taken into account when implementing the safe-removal feature.
Aspect 1: Mechanism to perform the actual deletion upon confirmation
Given the key purpose of this feature is for SAFE deletion, this step is crucial to ensure that there is a safety net for users before the actual removal of the contact.
Alternative 1 (current choice): To prompt the users for confirmation via a
yes/no, then proceed with parsing theyes/nouser input as independent commands inAddressBookParser- Pros: Maintains a similar command structure/workflow as all other commands (to go through
AddressBookParser) - Cons: Requires backward reference of previous command to check if the input was a valid
remove INDEXinput, currently implemented inRemoveConfirmation#isValidInput(), leading to a more complex implementation.
- Pros: Maintains a similar command structure/workflow as all other commands (to go through
Alternative 2: To create functions that directly handle the confirmation process within
RemoveCommand- Pros: Removes the need to access the previous command and assess its validity
- Cons: Changes the command structure/workflow
- This alternative would require a more complex implementation, as the confirmation process would be directly
handled within
RemoveCommand, leading to a more monolithic class structure. This would make it harder to maintain and extend the code in the future, as the class would be responsible for the confirmation processes AND the actual process of removing the contact, violating the Single Responsibility Principle.
- This alternative would require a more complex implementation, as the confirmation process would be directly
handled within
Decision:
Weighing the pros and cons of Alternatives 1 and 2, we have decided to go with Alternative 1.
Addressing the cons of Alternative 1, our current implementation is such that details of previous command are retrieved
from RemoveCommandParser within the RemoveConfirmation#isValidInput() method. This avoids exposure of the
remove INDEX command details, ensuring Separation of Concerns and adhering to the Single Responsibility Principle as
the RemoveConfirmation class solely handles the confirmation process itself and checks directly related to it.
Aspect 2: Potential safe-removal enhancement by first shortlisting the contact to be removed before
proceeding with remove INDEX, potentially reducing the amount of scrolling to find the contact to be removed.
Alternative 1: To use the same command word (i.e.
remove-remove NAMEthenremove INDEX) to perform the shortlisting of contacts with matching names, then identifying the specific contact to be removed by its index.- Pros: More intuitive for users to approach removal process
- Using the same command word
removefor both shortlisting and confirmation processes reduces the cognitive load, allowing the process to be more user-friendly
- Using the same command word
- Cons: More complex execution process
- This leads to ambiguity in the command execution process to new developers who are used to the conventions set
by other commands, as this command structure would make use of an overloaded
RemoveCommandconstructor. - This also introduces unnecessary complexity since the
RemoveCommandParserwill have to handle cases where contact names contain numbers, and users seek to shortlist contacts with the numbers in the name, to avoid invokingremove INDEXinstead.
- This leads to ambiguity in the command execution process to new developers who are used to the conventions set
by other commands, as this command structure would make use of an overloaded
- Pros: More intuitive for users to approach removal process
Alternative 2 (current choice): To encourage users to use the existing
findcommand to shortlist the contact(s) to be removed, then use theremove INDEXto identify the contact from a shorter list, proceeding with safe-removal.- Pros: Separates the shortlisting and confirmation processes to two distinct commands
- This reduces ambiguity in the command execution process for future developers
- Cons: Require 2 different commands for this enhanced safe-removal, which may come as a slight inconvenience to users.
- Pros: Separates the shortlisting and confirmation processes to two distinct commands
Decision:
Weighing the pros and cons of Alternatives 1 and 2, we have decided to go with Alternative 2 due to the clarity of
separation between the shortlisting and confirmation processes. Since this workflow is simply an enhancement to the
removal process, and given how find is relatively intuitive to use, we believe that the maintaining the separation of
shortlisting and removal using the existing find command would ultimately provide a more straightforward and intuitive
experience to users.
Other considerations:
- Separation of Concerns Principle: Maintaining the separation of the shortlisting and contact removal confirmation
processes (as opposed to overloading the
RemoveCommandconstructor) ensures that the command structure is clear and intuitive for future developers. This design decision promotes better code maintainability and extensibility, as the shortlisting process can be easily modified without affecting the confirmation process, especially since they are separate concerns to begin with. By adhering to the Separation of Concerns Principle, it has also ensured that theRemoveCommandclass adheres to the Single Responsibility Principle, as it is solely responsible for the confirmation process of the contact to be removed.
Fuzzy Input
Implementation
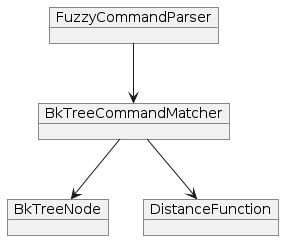
The BK-Tree data structure was employed by the implementation of the fuzzy input to effectively find words that are close to the target word in terms of their Levenshtein distance. Each node in the tree-like data structure represents a word and its children represent words that are one edit distance away.
The fuzzy input implementation consists of several components:
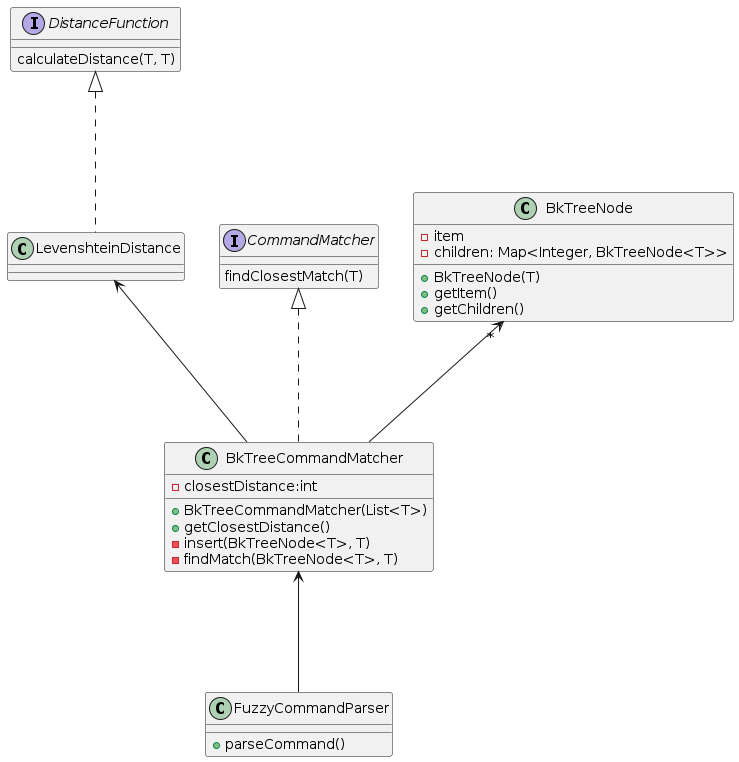
BkTreeCommandMatcher: The main BK-Tree data structure for sorting and efficiently search for similar elementsBkTreeNode: Internal node structure used by the Bk-TreeFuzzyCommandParser: A class demonstrating the usage of BK-tree for command parsingLevenshteinDistance: An implementation of the DistanceFunction interface using the Levenshtein distance algorithm
Our implementation follows the SOLID principle closely. We have designed interfaces to promote flexibility, especially
complying with the Open-Close Principle. This design decision makes it easy to extend various CommandMatchers or
DistanceFunctions in the future, making it easier to incorporate alternative algorithms if need be.
Given below is an example usage scenario and how the fuzzy input mechanism behaves:
Step 1 : User misspelled listing command
lustinstead oflist.- The
lustcommand callsFuzzyCommandParser#parseCommand(), causingBkTreeCommandMatcher#findClosestMatch()to get called in response. - The
BkTreewould be already initialised with the list of commands before the call.- During the initialisation,
BkTreecalculates the distances between the commands and constructs the tree accordingly.
- During the initialisation,
- When
findClosestMatch()is called, it initiates a search within theBkTreeconstructed.- Starting from root node, Bk-Tree traverses through nodes based on the distance between the target command
lustand commands stored in eachBkTreeNode. - The closest match found based on the specified distance metric (1 misspell) will be returned, in this case
listandAddressBookParser#parseCommand()will proceed on to thelist command.
- Starting from root node, Bk-Tree traverses through nodes based on the distance between the target command
- When calculating the distance between 2 commands,
BkTreecallsDistanceFunction#calculateDistance()method.- In this case, LevenshteinDistance class will calculate the distance.
- The
Step 2 : User entered unsupported command
peek- The
peekcommand callsFuzzyCommandParser#parseCommand(), causingBkTreeCommandMatcher#findClosestMatch()to get called in response. - Initialisation works the same as Step 1
findClosestMatch()does the same operation as Step 1- However, based on the Levenshtein Distance algorithm, the distance between
peekand any commands stored inBkTreeNodewill be greater than 1 which is greater than the specified distance metric. FuzzyCommandParser#parseCommand()will returnnullstring toAddressBookParser#parseCommand()- Since
nullis not a recognised command,ParseExceptionwill be thrown.
- However, based on the Levenshtein Distance algorithm, the distance between
- The
Design considerations:
Common fuzzy search algorithm for approximate string matching were compared to determine the optimal algorithm for our AddressBook.
Alternative 1 (current choice) Bk-Tree with Levenshtein Distance Algorithm
Pros: Tree-like data structure
- The hierarchical structure of BK-Tree allows search operations to run in logarithmic time, making them scalable for large datasets
- BK-Tree can work with different types of data, not limited to strings
Cons: Require more memory, a concern for memory-constrained environment
Alternative 2 Hamming Distance
- Pros: Straightforward to calculate and understand
- Cons: Only designed for comparing strings of equal length
Alternative 3 Bitap Algorithm
- Pros: Efficient for finding approximate matches of given pattern within a text
- Cons: Primarily designed for substring matching within texts
Alternative 4 Brute Force Method
- Pros: Easily to implement, no pre-processing required, takes no extra space
- Cons: Horrible run-time
For our AddressBook implementation, the BK-Tree with Levenshtein Distance Algorithm proved to be the optimal choice.
Its potential to extend code and efficiently handle misspelled or similar commands outweighs its memory usage and complexity of implementation.
This algorithm guarantees fast runtime performance and robustness in command parsing.
Sort feature
Implementation
The sorting mechanism is facilitated by SortCommand. It implements the following operations:
SortCommand#: Constructor class which is instantiated and stores the necessarySortStrategybased on user input.SortCommand#Executes: Executes the necessarySortStrategyand update the model.
The sorting mechanism consists of several components:
SortStrategy: An interface that requires implementations to define methods for sorting the address book and getting the category associated with the sorting strategy.SortByTagandSortByName: These classes implementSortStrategyinterface to provide the specific strategies of the AddressBook based on tags and names respectively.SortCommand: Initiates the sorting by parsing user input to determine the sorting criteria and calls the appropriate sorting class based on the input. After sorting, it then updates the list of persons in the model.
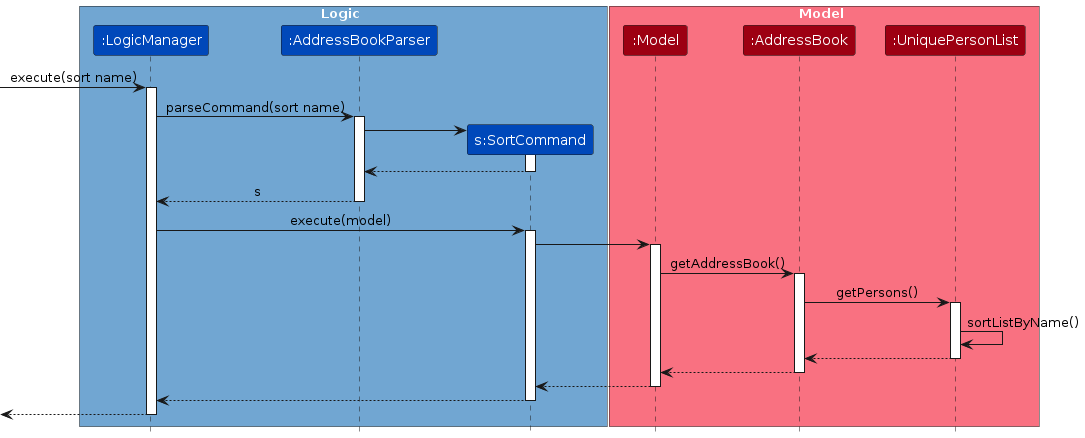
Given below is an example usage scenario and how the sorting mechanism behaves at each step.
Step 1: The user launches the application for the first time, no contacts will be present in the
AddressBook. When useraddcontacts in theAddressBook, contacts will be sorted based on their timestamp.Step 2: The user executes
sort namecommand.The
sortCommand#constructor will initialise with thesortByNamestrategy stored asSortStrategy.sortCommand#executewill pass the current model'sAddressBooktosortStrategy#sort, whereUniquePersonsListwill be obtained and sorted lexicographically by nameAfter sorting, the model will be updated to reflect the newly sorted contacts list, alongside a return statement to provide confirmation to the user.
Step 3: The user executes
sort tagcommand.- The
sortCommand#constructor will initialise with thesortByTagstrategy stored asSortStrategy. sortCommand#executewill pass the current model'sAddressBooktosortStrategy#sort, whereUniquePersonsListwill be obtained and sorted lexicographically by tags- After sorting, the model will be updated to reflect the newly sorted contacts list, alongside a return statement to provide confirmation to the user.
- The
Step 4: The user executes
sortcommand.- The
sortCommand#constructor will first verify the presence ofcondition inputbefore proceeding with initialisation. - Since there is no condition stated, a
ParseExceptionwill be thrown and a statement will be displayed to provide the correct input and conditions to be stated.
- The
Design consideration:
SolidStrategy interface was implemented for sorting functionality to adhere to SOLID principles, particularly the
Single Responsibility Principle, Interface Segregation Principle and Open/Close Principle.
Single Responsibility Principle
- The interface maintains single responsibility by defining methods for sorting strategies without burdening implementations with unrelated methods
Open/Closed Principle
- The interface provides an abstraction that allows for extension. New sorting strategies can be introduced by
implementing
SortStrategyinterface without altering existing code.
- The interface provides an abstraction that allows for extension. New sorting strategies can be introduced by
implementing
Interface Segregation Principle
- Segregates behavior for sorting into distinct methods
sortandgetCategory, thus, allowing different sorting strategies to implement only the methods they need, rather than being forced to implement monolithic interface with unnecessary methods.
- Segregates behavior for sorting into distinct methods
Alternative 1 (current choice)
sortmethod of theSortStrategyto take inAddressBookas its parameter.- Pros: Straightforward design and easy to implement.
- Sorting logic interacts directly with data structure being sorted.
- Cons: May be challenging to apply sorting strategies to different data structures without modification.
- Pros: Straightforward design and easy to implement.
Alternative 2
sortmethod of theSortStrategyto take inmodelas its parameter.- Pros: Sorting strategies can be applied to different data structures without modification
- Promoting code reuse and scalability.
- Cons: Requires access to
AddressBookeventually, introducing unnecessary complexity.
- Pros: Sorting strategies can be applied to different data structures without modification
Alternative 1 is chosen for the following reasons:
- Simplicity: keeps sorting logic simple and focused by directly interacting with the data structure being sorted.
- Clear Responsibility: Sorting logic is closely tied to the data structure it operates on, adhering to the Single Responsibility Principle.
- Ease of implementation: No need to pass unnecessary parameters to the sorting method.
- Reduce complexity and potential dependencies.
- Clear outline has been established that the only data structure present is the
AddressBookcontainingUniquePersonList.- There is not a need to apply sorting strategies to another different data structure.
Add By Step
Overview
addbystep loads up a separate window, which will prompt the users for the necessary input fields for an add command.
When all the fields have been successfully entered by the user, the user can copy the formatted command to their
clipboard.
Implementation
The architecture diagram given below explains the implementation for the UI for CommandHelperWindow
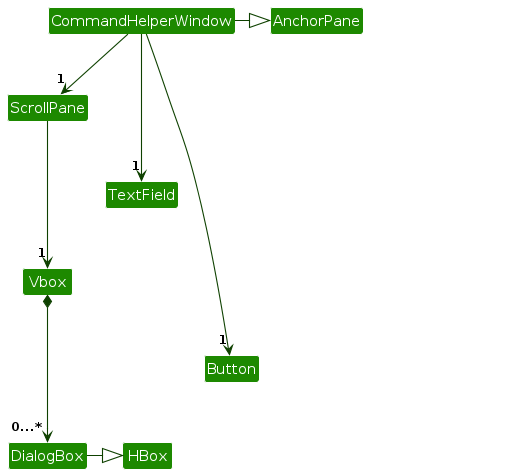
The functionality and purpose of the UI remains unchanged even though the implementation used for the UI is different.
The addbystep feature is facilitated by the AddCommandHelper and the CommandHelperWindow class. The
CommandHelperWindow serves as the UI for the user to interact with the AddCommandHelper. The AddCommandHelper is
responsible for accepting and checking whether the user's input is valid or not before prompting the user for the next
input field.
Given below is an example usage scenario and how the AddCommandHelper class behaves at each step. Note that while each
step for accepting fields may come off as repetitive, the type of invalid inputs for each field is different. Thus, we
wish to illustrate examples of invalid inputs for each field.
Step 1: The user enters the
addbystepcommand, causing theCommandHelperWindowto load up. It prompts the user for the name of the new contact.Step 2: The user enters the name of the new contact.
- If the name entered by the user is invalid (i.e. not alphanumeric), an error message will be shown and the user will have to enter the name again
- If the name entered by the user is valid, the user will be prompted to enter the next field (number)
Step 3: The user enters the number of the new contact.
- If the number entered by the user is invalid (i.e. one digit), an error message will be shown and the user will will have to enter the number again
- If the number entered by the user is valid, the user will be prompted to enter the next field (email)
Step 4: The user enters the email of the new contact.
- If the email entered by the user is invalid (i.e. does not have the
@symbol) an error message will be shown and the user will have to enter the email again - If the email entered by the user is valid, the user will be prompted to enter the next field (address)
- If the email entered by the user is invalid (i.e. does not have the
Step 5: The user enters the address of the new contact.
- If the address entered by the user is invalid (i.e. blank), an error message will be shown and the user will have to enter the address again
- If the address entered by the user is valid, the user will be prompted to type the copy command (
cp)
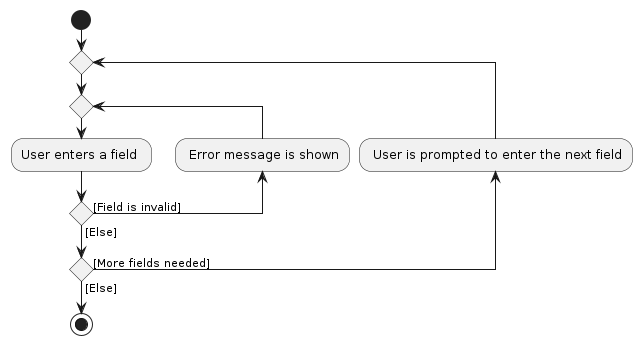
From steps 2 - 5, attached below is an activity diagram of how the user interacts with the AddCommandHelper when they
are keying in the necessary inputs. The AddCommandHelper continuously validates the user's input to ensure that they
have entered all the necessary fields correctly.
Step 6: The user enters the
cpcommand.- The user can enter anything at this stage, but only the
cpcommand will result in the formattedaddcommand to be copied to the clipboard. Other inputs will result in the same prompt message at the end of Step 5
- The user can enter anything at this stage, but only the
Step 7: The successfully copied message will be displayed to the user, and the user can now close the
CommandHelperWindowwindow.- The user can still continue interacting with the
CommandHelperWindow, but those interactions are meaningless, thus we will not go into the details of those interactions.
- The user can still continue interacting with the
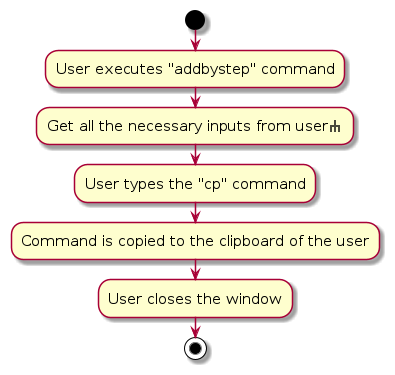
Below is an activity diagram that summarizes the process of a user using the addbystep feature.
Design considerations:
Aspect: How to implement assistance functions to aid users in typing their commands.
Alternative 1 (current choice) Create a new helper class and GUI to prompt users for the necessary details.
- Pros:
- It is easy to implement a new class, and due to the high cohesion of the previous code, we are able to reuse
methods defined previously in
ParserUtilclass to check the validity of the fields entered by the user - The
CommandHelperclass can be implemented separately from the rest of the classes. This results in lower coupling between the newly implementedCommandHelperclass and the remaining classes, resulting in easier maintenance and integration
- It is easy to implement a new class, and due to the high cohesion of the previous code, we are able to reuse
methods defined previously in
- Cons:
- The startup of another GUI for the helper class may introduce lag, especially on the older computers
- Pros:
Alternative 2 Implement a command to display the format for users to follow.
- Pros:
- It easier to implement as compared to the
CommandHelperclass, since prompts do not actually have any form of user interaction
- It easier to implement as compared to the
- Cons:
- It does not benefit users as much, as they can still make mistakes when it comes to following the exact format of the command
- Pros:
Alternative 3 Implement a function to autocomplete commands for users.
- Pros:
- It can be built directly into the original GUI for AddressBook, there is no need for a separate GUI for the
CommandHelperclass
- It can be built directly into the original GUI for AddressBook, there is no need for a separate GUI for the
- Cons:
- Autocomplete is only able to fill in certain parts of the command for the user (i.e. the prefixes for names, tags). It cannot fill in the exact details
- It is more difficult to implement as the users may try to autocomplete an invalid command, so there may be a need to perform checking of the command first, before letting the user know that the entered command is invalid.
- Pros:
Duplicate feature
Implementation
The feature to be able to add persons with duplicate names in the address book are facilitated by the use of the
DuplicateCommand. It implements the following operations:
DuplicateCommand#: Constructor class which is instantiated and stores the necessarytoAddperson object based on user input.DuplicateCommand#Executes: Executes the necessaryaddDuplicatePersonmethod and updates the model.
The sorting mechanism consists of several components:
addDuplicatePerson: A method bound by thePerson,ModelManager,AddressBookclasses that each contain similar logic to support a SLAP form of implementation for the end execution point i.e.executeinDuplicateCommand.DuplicateCommand: Initiates the duplication by parsing user input to determine the identity of the person to add. After duplicating, it then updates the list of persons in the model.
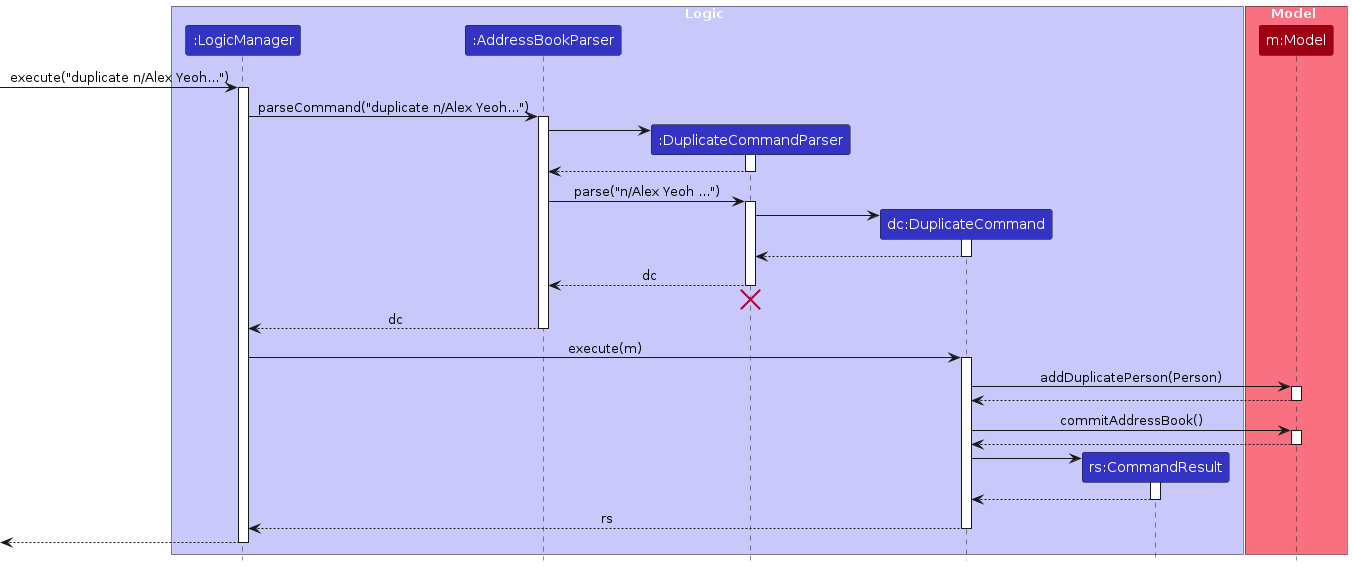
Given below is an example usage scenario and how the feature mechanism behaves at each step.
Step 1: The user launches the application for the first time, no contacts will be present in the
AddressBook. When useraddcontacts in theAddressBook, contacts will be sorted based on their timestamp.Step 2: The user reaches a point where they encounter the need to have to add a separate contact, that has the exact same name as another person in their
AddressBook.Step 3: To continue, the user executes
add /n... /e ...to attempt to add this new person.Step 4: The user then receives an error in their
AddressBookwhich alerts them that they already have such a person in theirAddressBook, and they have the option of creating a duplicate of this contact.Step 5: The user picks their choice and edits the command in their current
CommandBox, replacingaddwithduplicate, leaving the rest of the arguments untouched.Step 6: The user executes
duplicate /n... /e...command.- The
DuplicateCommand#constructor will initialize with thetoAddvariable based on the createdPersonobject inDuplicateCommandParser. DuplicateCommand#executewill pass thetoAddto themodel#addDuplicatePerson, whereUniquePersonsListis updated with the duplicated person.- After duplicating, the model will be updated to reflect the newly sorted contacts list, alongside a return statement to provide confirmation to the user.
- The
Design consideration:
DuplicateCommandParser interface was implemented to adhere to SOLID principles, particularly the Single Responsibility
Principle and Interface Segregation Principle.
- Single Responsibility Principle
- The class maintains single responsibility by defining methods for duplicating persons without burdening
implementations with unrelated methods
- The class maintains single responsibility by defining methods for duplicating persons without burdening
implementations with unrelated methods
- Interface Segregation Principle
- Segregates behavior for duplicating into distinct methods
addDuplicatePersonandgetPerson, thus, allowingDuplicateCommandto implement only the methods they need, rather than being forced to implement monolithic interface with unnecessary methods.
- Segregates behavior for duplicating into distinct methods
- Alternative 1
DuplicateCommandconstructor of theDuplicateCommandto take intoAddas its parameter.- Pros: Straightforward design and easy to implement.
- Duplication logic interacts directly with data structure being sorted.
- Duplication logic interacts directly with data structure being sorted.
- Pros: Straightforward design and easy to implement.
- Alternative 2
DuplicateCommandconstructor to take in all parameters of newly inserted person (name, address etc.)- Pros: Duplicating can be applied to different data structures without modification
- Promoting code reuse and scalability.
- Cons: Unnecessary complexity burden on
DuplicateCommandto parse the user inputs into aPersonand then execute the command.
- Pros: Duplicating can be applied to different data structures without modification
Alternative 1 is chosen for the following reasons:
- Simplicity: keeps duplicating logic simple and focused by directly interacting with the data structure(s) required.
- Clear Responsibility: Duplication logic is closely tied to the data structure it operates on, adhering to the Single Responsibility Principle.
- Ease of implementation: No need to pass unnecessary parameters to the
DuplicateCommandParsermethod.- Reduce complexity and potential dependencies.
Overwrite feature
Implementation
The feature to be able to overwrite a contact in the address book is facilitated by the use of the
OverwriteCommand, given that the target contact's name already exists in LookMeUp.
It implements the following operations:
OverwriteCommand#: Constructor class which is instantiated and stores the necessarytoAddperson object based on user input.OverwriteCommand#Executes: Executes the necessarysetDuplicatePersonmethod and updates the model.
The sorting mechanism consists of several components:
setDuplicatePerson: A method bound by thePerson,ModelManager,AddressBookclasses that each contain similar logic to support a SLAP form of implementation for the end execution point i.e.executeinOverwriteCommand.OverwriteCommand: Initiates the overwriting by parsing user input to determine the identity of the person to add. After overwriting, it then updates the list of persons in the model.
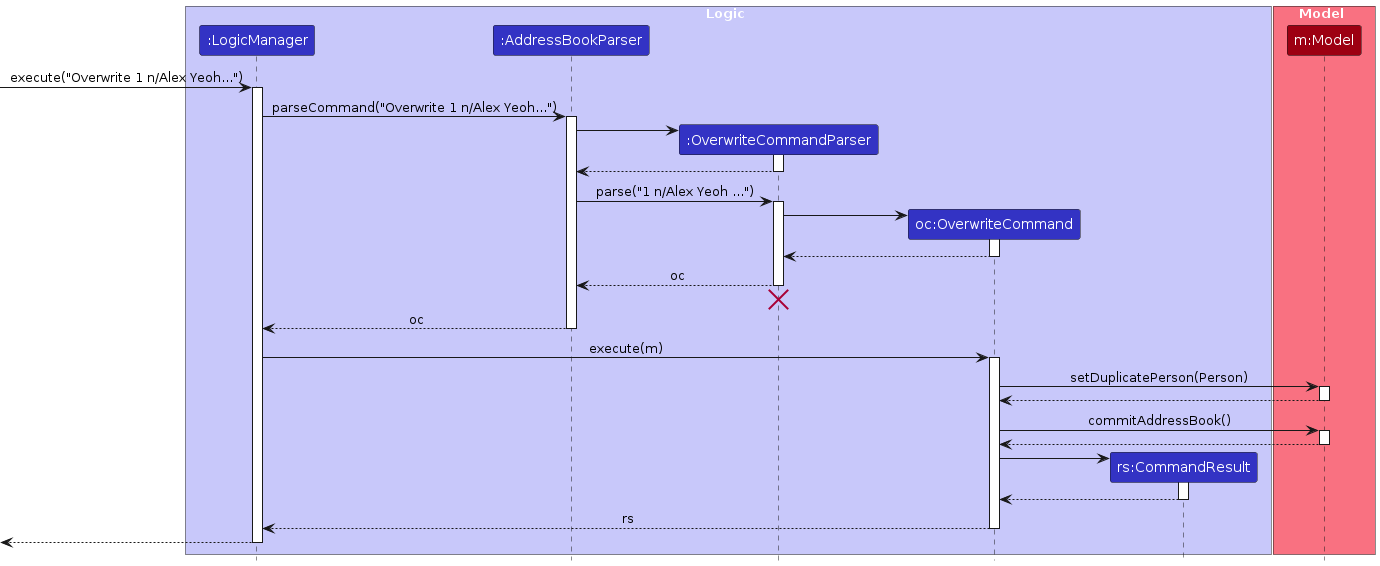
Given below is an example usage scenario and how the feature mechanism behaves at each step.
Step 1: The user launches the application for the first time, no contacts will be present in the
AddressBook. When useraddcontacts in theAddressBook, contacts will be sorted based on their timestamp.Step 2: The user reaches a point where they encounter the need to overwrite an existing contact, but has forgotten that they already have contact in their
AddressBook, just with some differing details like address or email.Step 3: To continue, the user executes
add /n... /e ...to attempt to add this seemingly new person.Step 4: The user then receives an error in their
AddressBookwhich alerts them that they already have such a person in theirAddressBook, and they have the option of overwriting the existing contact.Step 5: The user picks their choice and edits the command in their current
CommandBox, replacingaddwithoverwrite INDEX, leaving the rest of the arguments untouched.Step 6: The user executes
overwrite INDEX /n... /e...command.- The
OverwriteCommand#constructor will initialize with thetoAddvariable based on the createdPersonobject inOverwriteCommandParser, as well as the user's inputted index of person to be edited in theAddressBook. OverwriteCommand#executewill pass theindexOfTargetto themodel#getPerson, and will also pass thetoAddto themodel#setDuplicatePerson, whereUniquePersonsListis updated with the duplicated person.
- The
Design consideration:
OverwriteCommandParser class was implemented to adhere to SOLID principles, particularly the Single Responsibility
Principle and Interface Segregation Principle.
- Single Responsibility Principle
- The class maintains single responsibility by defining methods for overwriting persons without burdening
implementations with unrelated methods
- The class maintains single responsibility by defining methods for overwriting persons without burdening
implementations with unrelated methods
- Interface Segregation Principle
- Segregates behavior for overwriting into distinct methods
setDuplicatePersonandgetPerson, thus, allowingOverwriteCommandto implement only the methods they need, rather than being forced to implement monolithic interface with unnecessary methods.
- Segregates behavior for overwriting into distinct methods
- Alternative 1
OverwriteCommandconstructor of theOverwriteCommandto take intoAddas its parameter.- Pros: Straightforward design and easy to implement.
- Overwriting logic interacts directly with data structure being sorted.
- Overwriting logic interacts directly with data structure being sorted.
- Pros: Straightforward design and easy to implement.
- Alternative 2
OverwriteCommandconstructor to take in all parameters of newly inserted person (name, address etc.)- Pros: Overwriting strategy can be applied to different data structures without modification
- Promoting code reuse and scalability.
- Cons: Unnecessary complexity burden on
OverwriteCommandto parse the user inputs into aPersonand then execute the command.
- Pros: Overwriting strategy can be applied to different data structures without modification
Alternative 1 is chosen for the following reasons:
- Simplicity: keeps overwriting logic simple and focused by directly interacting with the data structure(s) requ ired.
- Clear Responsibility: Overwriting logic is closely tied to the data structure it operates on, adhering to the Single Responsibility Principle.
- Ease of implementation: No need to pass unnecessary parameters to the
OverwriteCommandParsermethod.- Reduce complexity and potential dependencies.
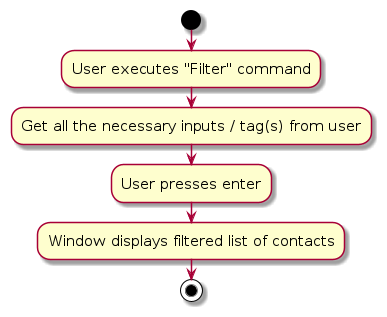
Filter feature
Implementation
The sorting mechanism is facilitated by FilterCommand. It implements the following operations:
FilterCommand#: Constructor class which is instantiated and stores the necessaryPredicatebased on user input.FilterCommand#Executes: Updates the model based on the generatedPredicate.
The filtering mechanism consists of several components:
Predicate: An instance of theTagContainsKeywordsPredicateclass that stores the list of tags that a user inputs.FilterCommand: Initiates the sorting by parsing user input to determine the filtering criteria and then updates the list of persons in the model viamodel#updateFilteredPersonList.
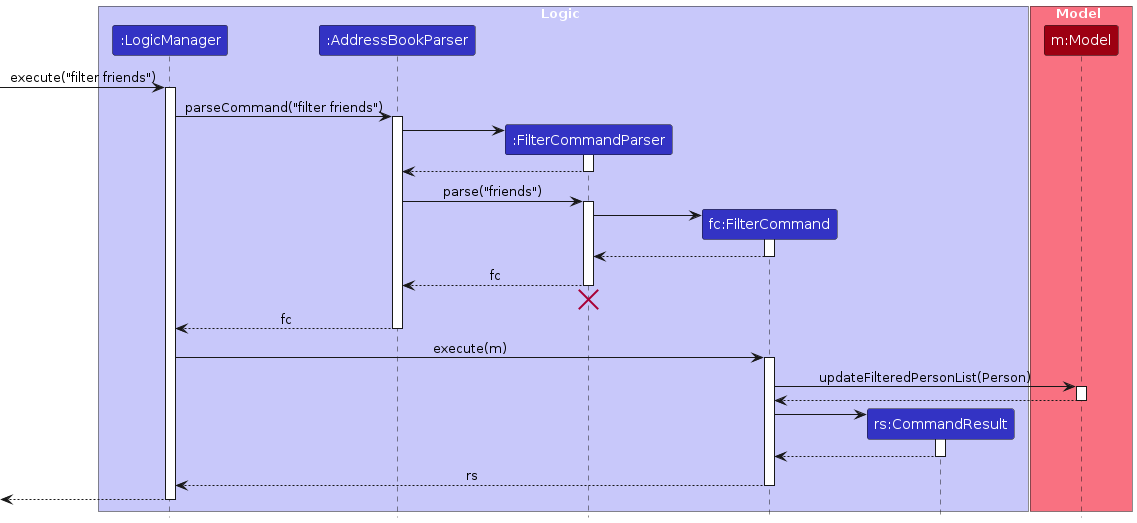
Given below is an example usage scenario and how the filter mechanism behaves at each step.
Step 1: The user launches the application for the first time, no contacts will be present in the
AddressBook. When useraddcontacts in theAddressBook, contacts are originally sorted based on their timestamp. Assume that after adding contacts, the user wants to filter by contacts that are tagged as friends.Step 2: The user executes
filter friendscommand.The
filterCommand#constructor will initialise and store the argument intopredicate.filterCommand#executewill pass thepredicatetomodel#updateFilteredPersonList, whereUniquePersonsListwill be obtained and filtered by the givenpredicateAfter filtering, the model will be updated to reflect the newly filtered contacts list, alongside a return statement to provide confirmation to the user.
Design consideration:
TagContainsKeywordsPredicate class was implemented for filtering functionality to adhere to SOLID principles, particularly the
Single Responsibility Principle, Interface Segregation Principle and Open/Close Principle.
- Single Responsibility Principle
- The class maintains single responsibility by defining the list of all tags that the user input, as well as testing for tag matches
without burdening implementations with unrelated methods
- The class maintains single responsibility by defining the list of all tags that the user input, as well as testing for tag matches
without burdening implementations with unrelated methods
- Interface Segregation Principle
- Segregates behavior for filtering into the method
test, thus, allowing different filtering strategies to implement only the methods they need.
- Segregates behavior for filtering into the method
- Alternative 1 (current choice)
FilterCommandconstructor to take inpredicateas its parameter.- Pros: Straightforward design and easy to implement.
- Filtering logic interacts directly with creation of new
TagContainsKeywordsPredicate, before passing it directly to theFilterCommandfor execution.
- Filtering logic interacts directly with creation of new
- Pros: Straightforward design and easy to implement.
- Alternative 2
FilterCommandconstructor to take in user input string as its parameter.- Pros: Filtering strategies can be applied to different data structures without modification
- Promoting code reuse and scalability.
- Pros: Filtering strategies can be applied to different data structures without modification
- Cons: Unnecessary complexity burden on
FilterCommandto parse the user input and then execute the command.
Alternative 1 is chosen for the following reasons: - Simplicity: keeps filtering logic simple and focused by directly interacting with the data structure, list in this case.
- Clear Responsibility: Filtering logic is closely tied to the data structure and class it operates on, adhering to the Single Responsibility Principle.
- Ease of implementation: No need to pass unnecessary parameters to the filter method.
- Reduce complexity and potential dependencies.
Copy User Info
Implementation
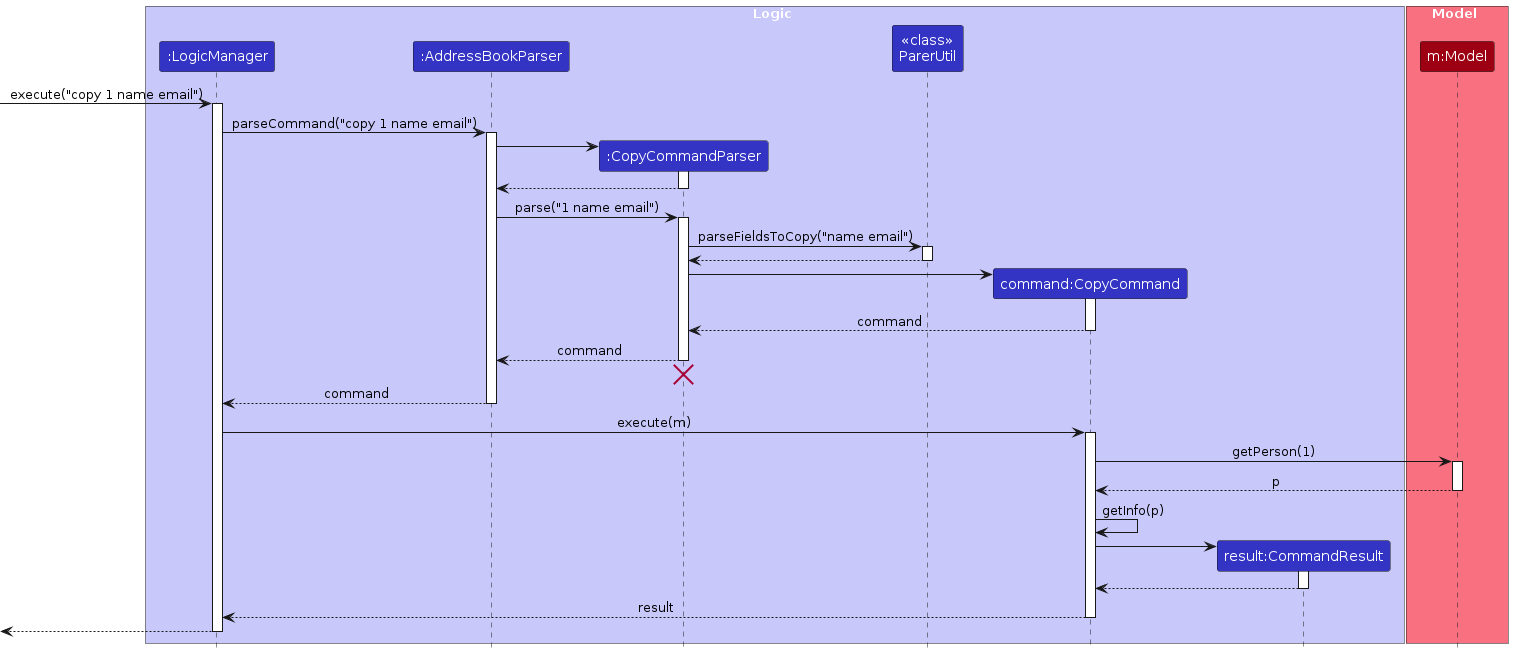
The copy command feature enhances a user experience by allowing the easy transfer of a contact's personal details directly into the clipboard of the user's operating system. The class, CopyCommand, is an inheritance of the Command class, that facilitates the process of copying essential information like a contact's name, email, and address, among other details. It offers users the flexibility to specify and copy multiple pieces of information simultaneously. The following example demonstrates how this command operates:
A user types in
copy 1 name emailinto the text field ofCommandBox.Logicis subsequently called to execute the command, whereAddressBookParserwould parse the input and return aCopyCommand(kindly refer to here for Logic design).When
AddressBookParser#parseCommand()is called, it makes use of switch statements to match thecopycommand and callsCopyCommandParser#parse().CopyCommandParser#parse()is solely responsible for: (i) checking if input argument is empty; (ii) checking if index provided is non-negative; and (iii) callingParserUtil#parseFieldsToCopy()to verify that fields provided by the user are of acceptable fields. By definition, acceptable fields includes onlyname,phone,emailandaddress.
Note: ParseException will be thrown and an error message will be shown to user if either (i) or (iii) is violated, while IndexOutOfBoundsException is thrown when (ii) is violated.
CopyCommandParser#parse()returns an instantiation ofCopyCommandwhere its constructor takes inIndexand aList<String> fieldsToCopyListas arguments. When the constructor ofCopyCommandis called, the constructor removes any duplicated values (if any) fromfieldsToCopyListwith the use of Java Streams. Refer to code snippet below:
// Constructor
public CopyCommand(Index targetIndex, List<String> fieldsToCopyList) {
        requireNonNull(targetIndex);
        this.targetIndex = targetIndex;
        this.fieldsToCopyList = fieldsToCopyList.stream()
                                  .distinct()
                                  .collect(Collectors.toList());
    }
- When
CopyCommand#execute()is called, the contact of interest is obtained with the aid ofModel#getPersonand the string representation of the information to be copied is retrieved byCopyCommand#getInfo(Person person)that returns aStringBuilder. The returnedStringBuilderis then converted toStringSelectionwhere it would be set as the content ofClipboard. The code snippet below shows the implementation ofCopyCommand#execute():
    @Override
    public CommandResult execute(Model model) throws CommandException {
        requireNonNull(model);
        Clipboard clipboard = Toolkit.getDefaultToolkit().getSystemClipboard();

        int zeroBasedIndex = targetIndex.getZeroBased();
        int addressBookSize = model.getAddressBook().getPersonList().size();

        if (zeroBasedIndex < 0 || zeroBasedIndex >= addressBookSize) { // checks if Index exceeds list of contacts
            throw new CommandException(MESSAGE_PERSON_NOT_FOUND);
        }

        Person person = model.getPerson(targetIndex.getZeroBased()); // retrieves Person of interest
        StringBuilder result = getInfo(person); // retrieves a person's information

        StringSelection toCopyString = new StringSelection(result.toString().trim());
        clipboard.setContents(toCopyString, null); // sets result to clipboard content

        return new CommandResult(MESSAGE_SUCCESS, false, false);
    }
Below is a sequence diagram of the overall Copy operation:
Design Considerations
Several design considerations were taken into account when implementing the copy feature. Below lists a few alternatives:
Alternative 1 (current choice): User keys in command to copy a contact's information.
- Pros:
- Does not violate product requirement (i.e. for typists).
- Does not involve the interaction of Java FXML.
- Testability works well with JUnit.
- Cons:
- Much harder to implement as SOLID principles have to be upheld.
- Pros:
Alternative 2: Utilize JavaFX to allow users to select which information to copy.
- Pros:
- Simpler design and implementation of functionality, as compared to alternative 1.
- Cons:
- Violates product requirement (not suitable for target audience).
- Much harder to test, requires external API such as TextFX to test.
- Pros:
From the two alternatives, alternative 1 was ultimately conceived as it does not violate our product's requirements. We believe that this design choice would benefit typists who wish to utilise input commands to retrieve contact information.
Exit Window
Implementation
For this feature, an exit window ExitWindow is created to seek confirmation from user to terminate LookMeUp. ExitWindow is packaged under UI , along with other various parts of Ui components e.g. CommandBox, ResultDisplay, and PersonList etc. Similar to other Ui components, ExitWindow inherits from UiPart which captures the commonalities between classes that represent the different part of the entire GUI.
The Ui layout of ExitWindow is defined under ExitWindow.fxml. Below elucidates how ExitWindow is used:
- User executes the command
exit, or other similar commands that resolves toexitdeemed by the fuzzy input algorithm. - An exit window will appear prompting for user confirmation to exit - Yes/No button.
- User would select either one of the 2 options.
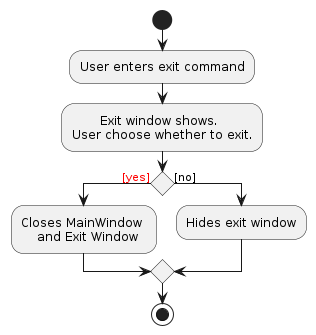
In ExitWindow.fxml, the Yes button is set as the default button such that the button receives a VK_ENTER press; the Yes button will always be in focus whenever ExitWindow is displayed. When a positive confirmation is received, ExitWindow#yesButton() would be called to terminate LookMeUp.
Consequently, the No button is set as the cancel button where it would receive a VK_ESC press that hides ExitWindow. ExitWindow#NoButton() would be called when a negative confirmation is received.
The behaviour of these implementations follow the behaviours as specified by JavaFx.
Design Considerations
Single Responsibility Principle
- The
ExitWindowmaintains the responsibility of displaying exit confirmation and handling a user choice, which reduces coupling between itself and other Ui components.
- The
Alternate implementation: A text field input that requires user to enter yes/no for confirmation. This design was not conceived as it requires the handling of invalid input, as is not as simple to implement as compared to the current implementation. Moreover, confirmation utilizing buttons is more intuitive for majority of users.
Input History Navigation
Implementation
This Ui feature allow users to restore previously entered commands typed in the CommandBox, regardless of the validity of the command. Similar to the CLI, users would use the Up/Down arrow keys to navigate previously typed commands in the input history.
The class that encapsulates all the history of the commands is InputHistory which is declared as a nested class inside CommandBox; this is because the history of commands should be the responsibility of CommandBox class and should not be openly accessible to other classes.
InputHistory is instantiated whenever the constructor of CommandBox is called. As such, there is an association between InputHistory and CommandBox. The implementation of InputHistory encapsulates an ArrayList<String> and an index-pointer. Whenever a command is received by CommandBox, the command typed will be stored inside InputHistory (regardless of validity), as shown by the code snippet below:
@FXML
public class CommandBox extends UiPart<Region> {

    ///Handles the event whenever a command is entered.
    @FXML
    private void handleCommandEntered() {
        String commandText = commandTextField.getText();
        if (commandText.equals("")) {
            return;
        }

        try {
            commandExecutor.execute(commandText); //execute command in Logic
        } catch (CommandException | ParseException e) {
            setStyleToIndicateCommandFailure();
        } finally {
            inputHistory.addToInputHistory(commandText);
            commandTextField.setText(""); // clears the textfield
        }
    }
}
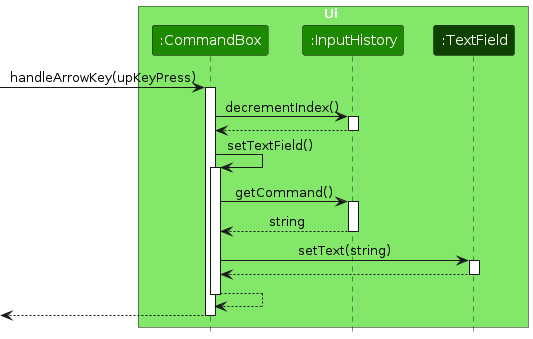
CommandBox#handleArrowKey() is called when a KeyEvent is detected by JavaFX event listener. With reference to the code snippet below, the function checks if InputHistory is empty. If the history is empty, it performs nothing. Else, it checks if whether the key pressed is an Up key, or a Down key. The code snippet below shows the implementation of CommandBox#handleArrowKey():
private void handleArrowKey(KeyEvent event) {
        String keyName = event.getCode().getName();

        //Performs nothing if there is no history.
        if (inputHistory.inputList.isEmpty()) {
            return;
        }
        if (keyName.equals("Up")) {
            inputHistory.decrementIndex(); //Reduces pointer by 1
            setTextField(); // Sets textfield according to pointer
        }
        if (keyName.equals("Down")) {
            inputHistory.incrementIndex(); //Increment pointer by 1
            setTextField(); //Sets textfield according to pointer
        }
}
When CommandBox#setTextField() is called, it requests for the command from InputHistory#getCommand() that is pointed by the pointer, and sets the text field of CommandBox that is returned by the method.
How the InputHistory index-pointer works:
Whenever a new command has been entered, the command is added into the list. The index-pointer is set to the size of the
ArrayList(i.e. it is pointing towards an empty slot in theArrayList).During an Up key press, the index-pointer is decremented by one (i.e. it is pointing towards an earlier command in the history).
During a Down key press, the index-pointer is incremented by one (i.e. it is point towards a later command in the history).
Below is a sequence diagram when an Up key is pressed:
Design Considerations
Single Responsibility Principle
CommandBoxandInputHistoryare gathered together as the two classes share the responsibilities of receiving and retrieving user inputs within the text field, hence increasing the overall cohesion of Ui components.
inputHistoryis set as a private variable as no other class should have access to the internal of the class, exceptCommandBoxitself. This allows encapsulation and information-hiding from other classes. Setter and Getter methods ofInputHistorysuch asdecrementIndex(),incrementIndex()andaddToInputHistory()etc. serve as functions to retrieve and modify the value of the class.Both
InputHistory#decrementIndex()andinputHistory#incrementIndex()are designed with guard clauses to prevent the index pointer from reducing below zero or exceeding beyond the bounds of theArrayList<String>.Alternative Design
- Currently, the implementation of
InputHistoryconsists of anArrayList<String>that stores all previously typed commands. An alternative solution to using an ArrayList would be LinkedList. However, LinkedList is not adopted as Java's LinkedList is implemented as Doubly-linked list which causes more memory overhead than ArrayList. Moreover, due to regular access of elements in the collection, ArrayList is a better design decision as itsgetoperation runs in constant time O(1), as compared to LinkedListgetO(n). Other methods such asremoveandsearchetc. were not considered in the design decision as these operations are not needed for implementingInputHistory, but may be relevant for future extensions to the class.
- Currently, the implementation of
Documentation, logging, testing, configuration, dev-ops
Appendix: Requirements
Product scope
Target user profile: NUS students who stay on campus
User Stories
Value proposition:
- Keeps track of the location and details specific to each contact, knowing who to make calls with
- Given how students who stay on campus find themselves in many different committees and interest groups, our Address Book seeks to provide features that allows them to compartmentalise their contacts and access various groups easily
User stories
Priorities: High (must have) - * * *, Medium (nice to have) - * *, Low (unlikely to have) - *
| Priority | As a … | I want to … | So that I can… |
|---|---|---|---|
* * * | Student in a lot of committees | Access my contacts by groups | Easily identify the people in their different committees and CCAs |
* * * | Student | Sort the contacts alphabetically | Easily navigate the address book |
Use cases
(For all use cases below, the System is LookMeUp and the Actor is the user, unless specified otherwise)
Use case: UC1 - Add a contact
Person that can play this role: Student in a lot of committees
MSS
- User types
addcommand. - LookMeUp adds the contact and displays the new contact in the database.
Use case ends.
Extensions
1a. User typed the
addcommand with an invalid format or field- 1a1. LookMeUp displays the error.
- 1a2. User enters the
addcommand again
Steps 1a1-1a2 are repeated until the command entered is correct.
Use case resumes from step 2.
Use case: UC2 - Remove a contact
Person that can play this role: Student who need a safety net to prevent accidental contact deletion
MSS
- User types
removecommand - LookMeUp requests for confirmation.
- LookMeUp removes the contact and displays an execution success message.
Use case ends.
Extensions
1a. User typed the
removecommand with an invalid format or field- 1a1. LookMeUp displays the error.
- 1a2. User enters the
removecommand again
Steps 1a1-1a2 are repeated until the command entered is correct.
Use case resumes from step 2.3a. User declines the removal of contact.
- 3a1, LookMeUp confirms user's selection.
Use case ends.
- 3a1, LookMeUp confirms user's selection.
Use case: UC3 - Filter contacts by tags
Person that can play this role: Student in a lot of committees
MSS
- User type
filtercontacts command - LookMeUp displays the contact in the database
Use case ends.
Extensions
1a. User typed an invalid command
- 1a1. LookMeUp displays the error.
- 1a2. User enters the correct command.
Steps 1a1-1a2 are repeated until the command entered is correct.
Use case resumes from step 2.
Use case: UC4 - Sort contacts by tags
Actor: User
Person that can play this role: Student in a lot of committees
MSS
- User type
sortcontacts command - LookMeUp displays the contact in the database
Use case ends.
Extensions
1a. User typed an invalid command
- 1a1. LookMeUp displays the error and shows a list of commands it supports.
- 1a2. User enters the correct command.
Steps 1a1-1a2 are repeated until the command entered is correct.
Use case resumes from step 2.
Use case: UC5 - Formatting an Add Command with system prompts
Person that can play this role: Student who is unfamiliar with the format of the Add command
MSS
- User type
addbystepcommand - LookMeUp prompts for details
- User enters the requested details
- LookMeUp will display the success message, and will prompt the user to type the copy command (
cp) - User types the Copy command
Use case ends.
Extensions
2a. User types an invalid detail.
- 2a1. LookMeUp displays the error.
- 2a2. User enters the detail again.
Steps 2a1-2a2 are repeated until the command entered is correct.
Use case resumes from step 3.4a. User types a input that is not the copy command.
- 4a1. LookMeUp will prompt the user to type the copy command.
- 4a2. User enters another input.
Steps 4a1-4a2 are repeated until the copy command is entered.
Use case: UC6 - Editing a command
Person that can play this role: Student who wishes to update the contact details of a contact
MSS
- User types the
editcommand. - LookMeUp edits the details of the contact and displays the new contact in the database.
Use case ends.
Extensions
1a. User typed the
editcommand with an invalid format or field- 1a1. LookMeUp displays the error.
- 1a2. User enters the
editcommand again
Steps 1a1-1a2 are repeated until the command entered is correct.
Use case resumes from step 2.
Use case: UC7 - Copying a contact's details
Person that can play this role: Student who wishes to copy the contact details of a contact
MSS
- User types the
copycommand. - LookMeUp copies the details of the contact specified by the user and displays the success message.
Use case ends.
Extensions
1a. User typed the
copycommand with an invalid format or field- 1a1. LookMeUp displays the error.
- 1a2. User enters the
copycommand again
Steps 1a1-1a2 are repeated until the command entered is correct.
Use case resumes from step 2.
Use case: UC8 - Undoing the last command
Person that can play this role: Student who entered a wrong command and wishes to revert his previous command
MSS
- User types the
undocommand. - LookMeUp reverts the command entered by the user and displays the success message.
Use case ends.
Extensions
- 1a. User typed the
undocommand with no previous state-changing commands- 1a1. LookMeUp displays the error.
Use case ends.
- 1a1. LookMeUp displays the error.
Use case: UC9 - Redoing an undo command
Person that can play this role: Student who wishes to redo the previous undo command
MSS
- User types the
redocommand. - LookMeUp reverts the latest undo command and displays the success message.
Use case ends.
Extensions
- 1a. User typed the
redocommand with no previous undo command.- 1a1. LookMeUp displays the error.
Use case ends.
- 1a1. LookMeUp displays the error.
Use case: UC10 - Clearing all the contacts in LookMeUp
Person that can play this role: Student who wants to delete all the contacts in LookMeUp
MSS
- User types the
clearcommand. - LookMeUp edits clears all the contacts and displays the success message to the user.
Use case ends.
Use case: UC11 - Exiting the application
Person that can play this role: Student who wishes to exit the application.
MSS
- User types the
exitcommand. - LookMeUp displays a the Exit window
- User clicks "yes"
- LookMeUp closes
Use case ends.
Extensions
- 3a. User clicks "no".
- 3a1, LookMeUp confirms user's selection.
Use case ends.
- 3a1, LookMeUp confirms user's selection.
Use case: UC12 - Retrieving a person by name
Person that can play this role: Student who wants to look up a specific contact in LookMeUp
MSS
- User types the
findcommand. - LookMeUp displays a list of people who watches the details entered by the user. Use case ends.
Use case: UC13 - Overwriting a contact in LookMeUp
Person that can play this role: Student who wishes to completely change the details of an existing contact.
MSS
- User types the
addcommand. - User is prompted that their contact list, already contains the same name as the person they wish to add.
- User types the
overwritecommand with the respective input fields. - LookMeUp changes the contact and displays the new contact in the database.
Use case ends.
Extensions
1a. User typed the
overwritecommand with an invalid format or field- 1a1. LookMeUp displays the error.
- 1a2. User enters the
overwritecommand again
Steps 1a1-1a2 are repeated until the command entered is correct.
Use case resumes from step 2.
Non-Functional Requirements
- Should work on any mainstream OS as long as it has Java
11or above installed. - Should be able to hold up to 1000 persons without a noticeable sluggishness in performance for typical usage.
- A user with above average typing speed for regular English text (i.e. not code, not system admin commands) should be able to accomplish most of the tasks faster using commands than using the mouse.
- A user should be able to add contacts even if they are not IT-savvy.
- Any operation executed on the app (list, remove, add, etc) should not take more than 10 minutes to process.
- The startup time for the application should not take more than 10 minutes.
- Side pop-up windows should not interfere with the execution of commands in the main window.
Glossary
- Mainstream OS: Windows, Linux, Unix, MacOS
- Private contact detail: A contact detail that is not meant to be shared with others
- IT-savvy: The user is not familiar with the exact format of the add command.
- Side pop-up window: Additional windows that can be opened by the user during usage of the software(e.g. the help window).
- SLAP: The Single Level of Abstraction Principle states that all the code inside a method should be at the same level of abstraction.
- SOLID principle: The SOLID principle is a set of five design principles used in object-oriented programming to make software designs more understandable, flexible, and maintainable. The acronym SOLID stands for:
- Single Responsibility Principle
- Open/Closed Principle
- Liskov Substitution Principle
- Interface Segregation Principle
- Dependency Inversion Principle
- Levenshtein distance: Measure of the difference between two strings, representing the minimum number of single-character edits (insertions, deletions, or substitutions) required to change one string into the other.
- BK-Tree: A tree data structure used to efficiently store and search for strings or other data based on their edit distance or similarity.
- Monolithic Interface: A single large interface encompasses all the functionality and operations of a system.
Appendix: Instructions for manual testing
Given below are instructions to test the app manually.
Note: These instructions only provide a starting point for testers to work on; testers are expected to do more exploratory testing.
Launch and shutdown
Initial launch
Download the jar file and copy into an empty folder
Double-click the jar file Expected: Shows the GUI with a set of sample contacts. The window size may not be optimum.
Saving window preferences
Resize the window to an optimum size. Move the window to a different location. Close the window.
Re-launch the app by double-clicking the jar file.
Expected: The most recent window size and location is retained.
Add By Step
Loading up the AddByStep Window
- Type
addbystepinto LookMeUp- Expected output: A new window should appear, prompting you for the name of the person to enter
- Leave the name blank and press the ENTER key
- Expected output: An error message should appear, and you have to enter the name again
- Type
Johninto the GUI- Expected output: The name will be successfully accepted, and you will be prompted for the next field
- You may follow the prompts to enter the subsequent details, examples of invalid inputs are given in the example use case scenario in Add By Step.
Edit contact
Edit contact based on the details provided. eg. Name, email, address etc.
Prerequisites: Existing LookMeUp contacts list must not be empty.
(Details of name, address etc. are a placeholder for the following test cases)
Test case:
edit 1 n/Alex YeohExpected: Contact at index 1's name has been edited to Alex Yeoh.
Test case:
edit 2 n/Bernice Yu p/91725373Expected: Contact at index 2's name and number have been edited to Bernice Yu, 91725373 respectively.
Filter contact list
Filter contact list based on the tag(s) provided.
Test case:
filter friendsExpected: Only contacts that have the tagfriendswill be shown in the contact listTest case:
filter NeighboursExpected: Only contacts that have the tagNeighbourswill be shown in the contact list
Duplicate
Add a person that has an identical name to a contact in your existing LookMeUp contacts.
Prerequisites: Existing LookMeUp contacts list must not be empty.
(Details of name, address etc. are a placeholder for the following test cases)
Test case:
duplicate n/Alex Yeoh a/Serangoon Crescent Street e/alexyo@example.com p/91234567Expected: Contact with above details (Name as Alex Yeoh, Phone as 91234567...) is added
Test case:
duplicate n/Bernice Yu a/Serangoon Crescent Street e/berniceyu@example.com p/91234568Expected: Contact with above details (Name as Bernice Yu, Phone as 91234568...) is added
Test case:
duplicate nExpected: No contact is added. Error details are shown in the status message.
Overwrite
Overwrites a person that has an identical name to a contact in your existing LookMeUp contacts.
Prerequisites: Existing LookMeUp contacts list must not be empty.
(Details of name, address etc. are a placeholder for the following test cases)
Test case:
overwrite 1 n/Alex Yeoh a/Serangoon Crescent Street e/alexyo@example.com p/91234567Expected: Contact at index 1, and with above details (Name as Alex Yeoh, Phone as 91234567...) is overwritten
Test case:
overwrite 2 n/Bernice Yu a/Serangoon Crescent Street e/berniceyu@example.com p/91234568Expected: Contact at index 2, and with above details (Name as Bernice Yu, Phone as 91234568...) is overwritten
Test case:
overwrite 1Expected: No contact is overwritten. Error details are shown in the status message.
Safe Removal of a Person
Removing a person while all persons are being shown
Prerequisites: List all persons using the
listcommand. Multiple persons in the list.Test case: With a list of at least 2 contacts, enter
remove 2
Expected: Second contact is spotlighted from the list. Prompt to confirm removal withyes/no.- If
yes, the contact will be removed. A success message and details of the removed contact will be shown in the status message. Timestamp in the status bar is updated. - If
no, the contact will not be removed. Status message will show the removal is aborted. Status bar remains the same.
- If
Test case:
remove 0
Expected: No person is removed. Error details shown in the status message. Status bar remains the same.Other incorrect remove commands to try:
remove,remove x,...(where x is larger than the list size)
Expected: Respective error messages. Similar to previous.
Fuzzy Input
Handling a command with a single misspelled letter.
- Test case:
lort name
Expected:sort namecommand will still be executed and contact list will be sorted alphabetically based on person's name - Test case:
lst
Expected:listcommand will still be executed and all the contacts will be listed in the contact list. - Other misspelled command to try:
fwlter TAG,adbystep,...
Expected: Correctly spelled commands will still be executed as intended.
Sorting contact list
Sort contact list based on the keywords input.
Test case:
sort name
Expected: Contact list will be sorted lexicographically based on person's name.Test case:
sort tag
Expected: Contact list will be sorted lexicographically based on person's tags.
Copy Contact Information
Retrieve a contact's information into system clipboard.
Given this example:

Below shows a list of possible commands:
| Sample Commands | Details | Results |
|---|---|---|
copy -1 name | Copies the name of contact indexed -1 | N.A. Error will be shown. |
copy 4 tag | Copies the tag of contact indexed 4 | N.A. Tag is not a valid field. |
copy 4 name | Extra spaces between copy and index | Taylor Sheesh |
copy 4 name | Extra spaces between index and name | N.A Error prompt fields not recognised. |
For more sample test cases, kindly refer to the UG.
Undo / Redo
Enter
add n/Jia wei p/97743772 e/jw@gmail.com a/Block E 02-22 t/friendin the command box.Expected output: A new contact named "Jia wei" will be added to your list, and will be found at the last index.
Enter
undoin the command box.Expected output: The contact list will revert back to its state before the contact was added in Step 1.
Enter
redoin the command box.Expected output: The contact list will revert back to the state after the contact was added as it is in Step 2.
Within the same application launch, you may try to perform n consecutive state-changing commands, then directly followed by
undo, and expect to be able to runundon consecutive times as well. Similarly, with x consecutiveundocommands, you should be able to runredoconsecutively x times as well.
Note: Examples of commands that are NOT state-changing include: filter, list and hence if you try to undo,
there will be an error message that there is no command to undo.
Do also note that the redo command must be immediately preceded with undo, failing which (false example:
add n/... , undo, remove 1, then redo) there will be an error message that there is no command to redo.
Saving data
Dealing with missing/corrupted data files
- Open the .json file where the details of the contact have been started
- Go to the name of the first person, and remove the name (This will corrupt the data file as the name cannot be blank)
- Run LookMeUp, and execute a command (any command will do)
- Expected output: LookMeUp will load up blank, and after the execution of the command, the corrupted json file will be erased.
Planned Enhancements
Our team consists of 5 members.
Add an
exitcommand toAddCommandHelperto enhance AddByStep process- Currently,
AddCommandHelperhas to be closed manually, which is not optimised for fast typists. - We plan to add an exit command to
AddCommandHelpersuch that you can close the window simply by typing theexitcommand
- Currently,
Vary Distance Metric for Fuzzy Input
- Currently, the MAX_DISTANCE for the distance metric is set to 1.
- To enhance user-experience and accommodate longer commands with potentially more misspellings, it would be advantageous to dynamically adjust the MAX_DISTANCE according to the length of the correct command string.
- This approach allows a more flexible and adaptable matching process, guaranteeing that the misspelling tolerance varies proportionately with command length.
- By dynamically adjusting the MAX_DISTANCE, longer and more complex input command like
addbystepcan be accurately
identified.
Enhance Invalid Input Error-Handling for Safe-Removal Confirmation Step
- Currently, when a user is prompted for confirmation, to enter either a
yesornoinput, if they enter any other (invalid) input e.g.abc, they will be prompted with anUnknown Commanderror message, which is too general. - With the
Unknown Commandprompt, though the GUI still shows the spotlighted contact for removal, the user is unable to directly typeyes/noto proceed with the confirmation as the system does not recognise that the user is still in the process of removing the contact, which brings slight inconvenience though there is a simple step to get around it by typingremove 1thenyes/noto proceed with the confirmation. - 2 Enhancements:
- We plan to improve the
Unknown Commanderror message to be more specific, such asInvalid Input, please enter 'yes' if you wish to proceed with the removal, and 'no' if you wish to abort the removal process. - Together with this, we are also planning to change the internal validity checking process of
RemoveConfirmation#isValidInputto check for whether the last VALID input is aRemoveCommandinstead of simply checking the last input (which currently makes the system prone to keeping track of the invalid input and assuming the user is no longer doing a removal). This would remove the inconvenience of having to typeremove 1.
- We plan to improve the
- Currently, when a user is prompted for confirmation, to enter either a
Improve Name Validation for Name Field
- Currently, names can only contain alphanumeric characters and spaces. Legal names such as
Joseph King Jr.,Shaquille O'Neal,Mary-Anne TanorRavichandram S/O Rameshare considered invalid. - We plan to update the validation regex to enable special characters such as
',-,/, and.to be recognised - This allows LookMeUp to accommodate to more users, and to be more inclusive.
- Currently, names can only contain alphanumeric characters and spaces. Legal names such as